Focal Plane Assembly Build
You may build a ground station for use with pypogs, with the general architecture shown below:
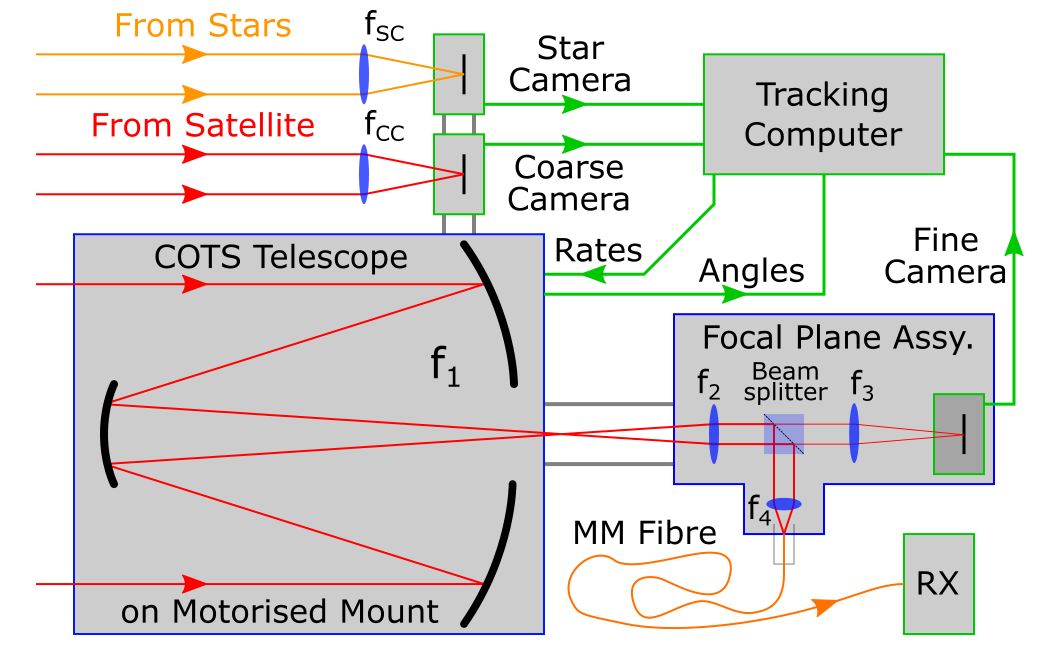
This can be implemented without any modifications to your telescope by replacing the eyepiece of your telescope with a focal plane assembly (FPA) show below besides an eyepiece:
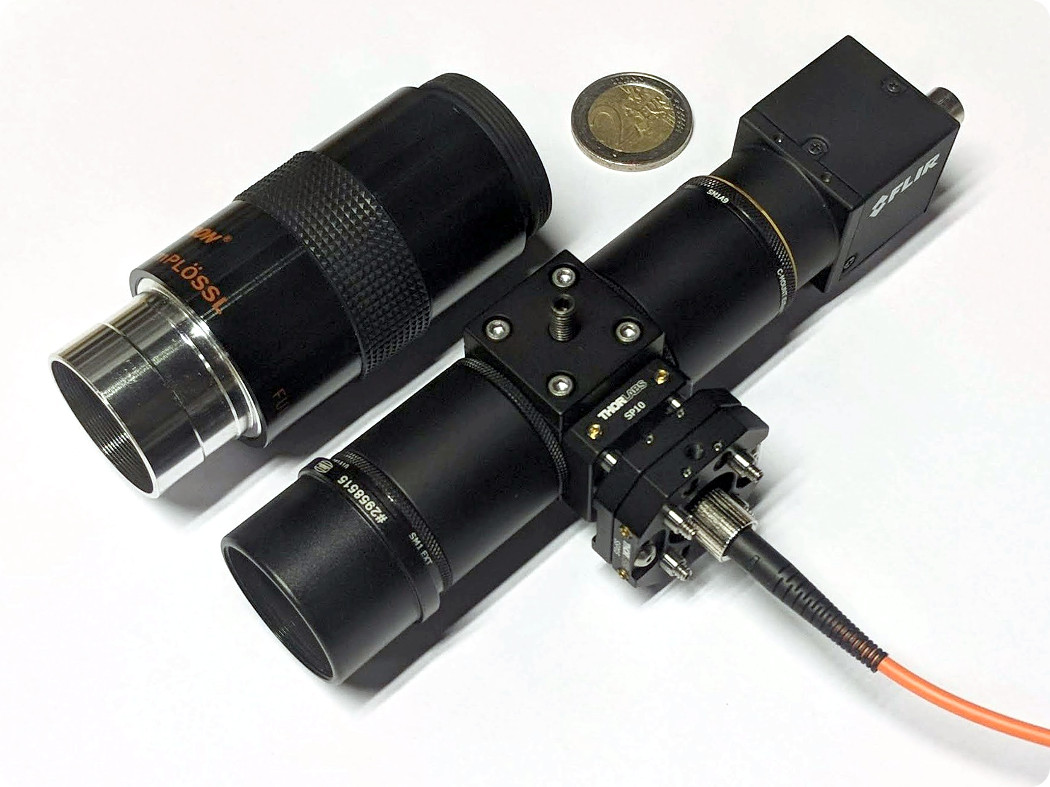
The FPA costs less than 1000 euros (or dollars) to build (excl. the camera).
Parts needed
All optomechanics and optics may be ordered from Thorlabs except for the adapter to a telescope eyepice barrel. Your telescope vendor should have such an item. An example can be seen from Teleskop Service. You may adapt this FPA to use T2-mount (instead of C-mount) adapters and to use 2” instead of 1.25” eyepiece barrels.
Base items
- SC6W; 16 mm Cage Cube; 1pc
- SM05CP2; SM05 End Cap; 1pc
- SPM2; Cage Prism Mount; 1pc
- SB6C; Cube Clamp; 1pc
- SR1-P4; Cage Rod, 1” Long, 4 Pack; 1pc
- SSP05; XY Slip Plate; 1pc
- SM05FC; FC/PC SM05 Fibre Adapter; 1pc *
- SM05A3; SM05 to SM1 Adapter; 2pc
- SM1L10; SM1 Lens Tube, 1” Long; 1pc **
- SM1M10; SM1 Lens Tube w/o External Thread, 1” Long; 1pc ***
- SM1A9; C-Mount to SM1 Adapter; 1pc
- SM1A10; SM1 to C-Mount Adapter; 1pc
* May change for fibre connector of your choosing.** May need to adjust length based on focal length f3.*** May need to adjust length based on focal length f2.
Optics and mounts
For lenses f2 and f3 a lens with diameter 1” or less (1/2” recommended) may be used. For your chosen lens diameter, get an appropriate SM1A{…} adapter from the category “Mounting Adapters with Internal and External Threads”. You may also use pre-mounted lenses and an adapter to SM1 thread in these positions.
For the lens f4 a lens with diameter 1/2” or less may be used (8mm recommended). For your chosen lens diameter, get an appropriate SP{…} adapter from the category “16 mm Cage Plates for Unmounted Optics” (or the SP02 for 1/2” lens diameter). You may also use pre-mounted lenses and an adapter to SM05 thread in the SP02 mount if preferred.
The beam-splitter must be a 10mm cube. Thorlabs has a range of non-polarising beam-splitters with reflection:transmission of 10:90, 30:70, 50:50, 70:30, 90:10. Typically 10% to the tracking camera is used. The maximum clear aperture of the FPA is limited by the beamsplitter’s clear aperture, which for Thorlabs’ offerings is 8mm.
There is space in the FPA to mount filters (1” or 1/2”) after f2 or before f3 inside each lens tube, or a filter (1/2”) in an SP02 cage plate before f4 to suit your application.
A recommended setup would be:
- SM1A6T; SM1 Adapter for 1/2” (SM05) Optic; 2pc (f2 and f3 mount)
- AC127-025-B; f=25mm, 1/2” Achromatic Doublet; 1pc (f2)
- AC127-030-B; f=30mm, 1/2” Achromatic Doublet; 1pc (f3)
- SP10; 16 mm Cage Plate for 8mm Optic; 1pc (f4 mount)
- AC080-010-B; f=10mm, 8mm Achromatic Doublet; 1pc (f4)
- BS071; 90:10 (R:T) beam-splitter 10mm cube; 1pc
Extras
It is recommended to get some glue (e.g. cyanoacrylate) to permanently bond the beam-splitter to the cage prism mount for stability, and matte-black aluminium foil to shield the FPA from stray light.
Useful to rotate the camera:
- CMSP025; C-Mount Spacer Ring, .25mm Thick; 1pc
- CMSP050; C-Mount Spacer Ring, .5mm Thick; 1pc
- CMSP100; C-Mount Spacer Ring, 1mm Thick; 1pc
Useful for building/aligning:
- SPW602; Spanner Wrench for SM1; 1pc
- SPW603; Spanner Wrench for SM05; 1pc
- SR05-P4; Cage Rod, 1/2” Long, 4 Pack; 1pc
- SCPA1; 16 mm Cage Alignment Plate; 1pc
- CPS635R; Collimated Laser Module, 635 nm, 1.2 mW; 1pc
- CPS11K(-EC); Ø11 mm Laser Diode Module Mounting Kit; 1pc
- SP03; 16mm Cage Plate Clear Aperture; 1pc
- MSP2(/M); Mini Pedestal Pillar Post; 1pc
- MSC2; Mini Clamping Fork; 1pc
Constuction
Add two SM05A3 adapters to opposite sides of your SC6W cage cube.
Add four SR1 rods to one side of your cage cube.
Glue your beam-splitter to the SPM2 mount and insert into cage cube (take care of orientation!).
Mount your camera to the SM1L10 lens tube with the SM1A9 adapter.
Mount your f3 lens in its SM1A6T adapter (take care of orientation!) and place in lens tube.
Optional for setting camera rotation:
- Attach the lens tube with the camera to the cage cube.
- Add CMSPxxx spacers as desired to rotate the camera.
- Remove the camera again and continue the steps.
Lock your f3 lens in infinity focus (e.g. focus on something far away).
Mount the lens tube to the cage cube SM05A3 adapter.
Mount your f4 lens in its SP10 cage plate adapter (take care of orientation!).
Lock the f4 cage plate on the SR1 rods, flush with the cage cube.
Attach SM05FC fibre adapter in SSP05 slip plate and mount on the SR1 rods.
Attach a fibre and illuminate from the opposite end. You will see reflections from the beam-splitter on your camera. Rotate the beam-splitter until the reflections overlap and adjust the slip plate position until a centered sharp image of the fibre face is seen.
Lock your beam-splitter rotation and add SB6C clamp, lighly pressing on the beam-splitter.
Mount your f2 lens in its SM1A6T adapter (take care of orientation!) and place in SM1M10 lens tube. Attach to cage cube’s SM05A3 adapter.
Fix position of f2 such that primary focus is a few mm outside the lens tube (typically this lens sits as close to the cage cube as possible).
Add SM1A10 adapter and your C-mount to telescope eyepiece barrel (e.g. 1.25”).
Finish by adding SM05CP2 end cap in the unused hole.